In the previous post, we learned the difference between Posts and Pages. In this tutorial, we will discuss the WordPress editor that comes with posts and pages where you create the content.
Once inside the Post (or a Page), on the top you will find a row of tools known as WordPress Editor Toolbar. This toolbar can be extended to two rows by using the toggle button in first row. More functionality can be added to toolbar by using external plugins. Here, we will discuss the default toolbar which comes with WordPress without installing any extra plugin.
WordPress editor toolbar is a simple MS office like product toolbar. If you have used MS office product earlier then you will find it very easy to use.

Visual WordPress Editor
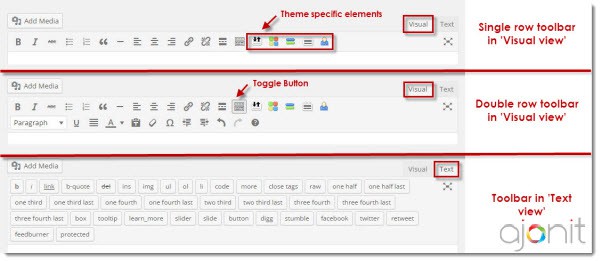
The first section in the above image shows the single row toolbar in visual mode which you will see by default without applying any setting or touching any option. In this row of toolbar you can see many options like making text bold using B button, making text italic using I button, cross off or strike through the word using ABC button, making text in Bulleted list format, making text in Numbered list format, adding the Blockquote “, adding the Horizontal line _, aligning the text left, center or right, inserting, editing or removing a link, inserting read more tag, toggle button to expand the toolbar to second row and at the very right side the ‘Distraction-free writing mode’.
The second section of image above shows the second row of toolbar which can be seen by clicking the toggle button in first row. This is the part of visual toolbar which is hidden by default. Once you enable it, there will be options for creating text content in different formats like paragraph, Heading 1, Heading 2, Heading 3, Heading 4, Heading 5 and Heading 6 and Preformatted. These styles are used in the text content to make content semantically relevant so that it follows the web standard hierarchy of arranging content.
In the same section you can see option to underline text U, option to justify text content to fit it across the width of the page, option to choose text color, option to ‘paste as text’ which can be used to paste content from other places by removing extra formatting, option to clear formatting from selected text, option to include special characters like Ω, options to decrease indent, increase indent, undo, redo and keyboard shortcuts.
For most of the sites these options should be sufficient, however in case one needs some additional functionality, it can be enabled by external plugins. Sometimes themes also comes with special functionality which gets automatically added to the default editor toolbar, as we have seen in the first section of the image.
Text WordPress Editor
In the third and last section of the image, you can see we have changed the view of the editor from Visual to ‘Text’. These are the two different views of the WordPress Editor. One is Visual where you can see the normal content which you type while the second one is Text part which will show the content with the HTML code. If you are bit technical or you know basic HTML, then you can easily understand the text part of editor. Having said that, a normal user – who is beginning to learn WordPress – need not worry about the text editor mode at all.
Once you switch to ‘Text’ mode, you can find a new types of toolbar which contains almost same buttons as found in visual toolbar but in text form.
There is an option which is universal and situated at left top corner of the toolbar namely ‘Add Media’. This is the option which can be used to add images, audio, video or other media files to your posts or pages. When you click on that button, you need to upload specific media file from your local computer which will be attached to that particular post or page.
Don’t worry if you fee a bit overwhelmed, once you start using the toolbar, you will find it intuitive. With time you will be able to use it effortlessly.

