Welcome to the next step in your Selenium journey! In our previous articles, we’ve covered quite a bit of ground:
- We started with an overview of Selenium in our What is Selenium article, introducing you to this powerful tool for web automation.
- Next, we walked you through the process of installing Selenium, ensuring you have the necessary components ready.
- We then guided you on setting up PyCharm, an excellent Integrated Development Environment (IDE) for Python that works great with Selenium.
- Lastly, we delved into the architecture of Selenium WebDriver, giving you a solid understanding of how Selenium works under the hood.
Now that you have a strong foundation, it’s time to put your knowledge into practice. In this tutorial, we’ll guide you through writing your very first Selenium WebDriver script in Python.

Your First Selenium Script
Let’s start with a simple script that opens a webpage, extracts some text, and compares it to an expected value. We’ll use the example.com website for this demonstration.
from selenium import webdriver
from selenium.webdriver.common.by import By

# Initialize the WebDriver (in this case, Chrome)
driver = webdriver.Chrome()

# Open a simple HTML page
driver.get("https://www.example.com")

# Find the h1 element and get its text
heading = driver.find_element(By.TAG_NAME, "h1")
heading_text = heading.text

# Print the text found
print("Text found:", heading_text)

# Compare the text with "Example Domain"
expected_text = "Example Domain"
if heading_text == expected_text:
    print("The heading matches the expected text.")
else:
    print(f"The heading does not match. Expected '{expected_text}', but found '{heading_text}'.")

# Close the browser
driver.quit()
Breaking Down the Script
Let’s go through each part of the script to understand what’s happening:
- Importing Selenium components:
from selenium import webdriver
from selenium.webdriver.common.by import By
These lines import the necessary Selenium modules. We need
webdriverto control the browser andByto locate elements on the webpage. - Initializing the WebDriver:
driver = webdriver.Chrome()This creates an instance of Chrome WebDriver. When you run this line, you’ll see a new Chrome window open.
- Navigating to a webpage:
driver.get("https://www.example.com")This command tells the browser to go to example.com.
- Finding and extracting text from an element:
heading = driver.find_element(By.TAG_NAME, "h1")
heading_text = heading.text
Here, we’re finding the first
<h1>element on the page and extracting its text content. - Printing the extracted text:
print("Text found:", heading_text)This line simply prints the text we found to the console.
- Comparing the extracted text:
expected_text = "Example Domain"
if heading_text == expected_text:
    print("The heading matches the expected text.")
else:
    print(f"The heading does not match. Expected '{expected_text}', but found '{heading_text}'.")
This block compares the text we found with what we expected. It’s a simple way to verify that the webpage contains the content we’re looking for.
- Closing the browser:
driver.quit()This command closes the browser and ends the WebDriver session. It’s important to include this to free up system resources.
A Common Question: How to Know Which Modules to Import?
If you’re new to Selenium, you might wonder, How do we know which library or module to import? For instance, how did we know to import the By module?
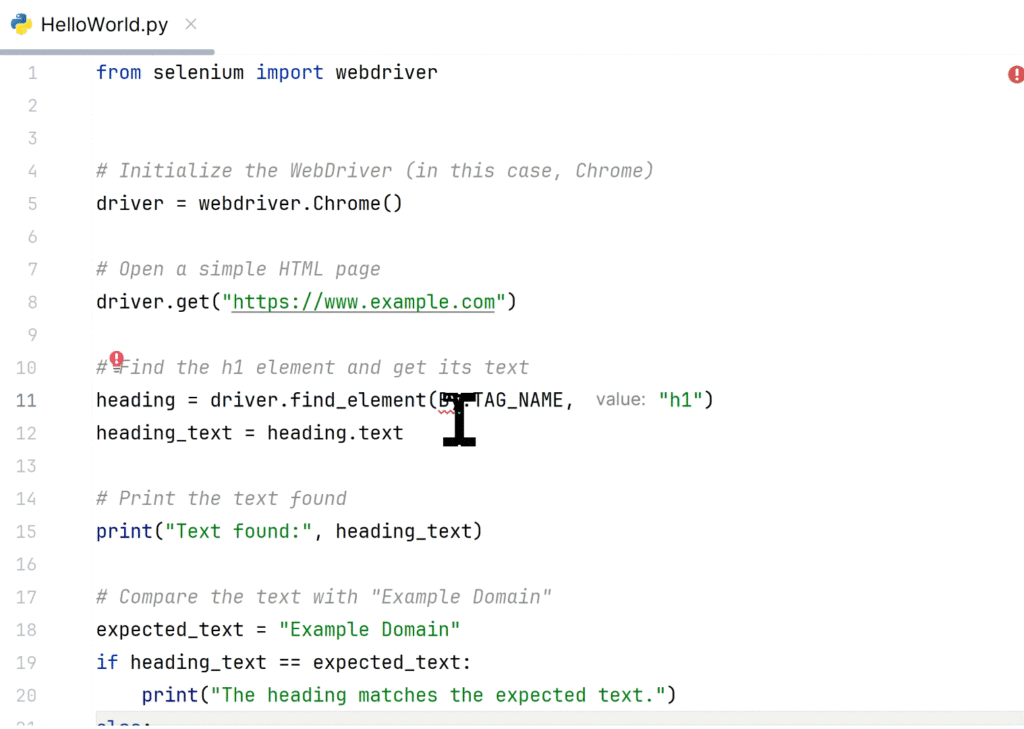
Here’s a helpful tip: Your IDE (Integrated Development Environment) like PyCharm can guide you. Here’s how it works:
- As you write your code, when you type a class or function name that isn’t imported yet (like
By), your IDE will usually highlight it or underline it to indicate it’s not recognized. - Most modern IDEs, including PyCharm, will then offer an auto-import suggestion. This often appears as a small lightbulb icon or a quick-fix option near the unrecognized name.
- Click on this suggestion, and the IDE will automatically add the correct import statement at the top of your file.
- If auto-import doesn’t appear, you can usually trigger it manually. In PyCharm, for example, you can place your cursor on the unrecognized name and press
Alt+Enter(on Windows/Linux) orOption+Return(on Mac) to see available actions, including import suggestions.
Check a quick illustration below.

This feature not only saves time but also helps you learn which modules contain the classes and functions you need. Over time, you’ll become familiar with common imports, but it’s always okay to rely on your IDE for help, even as an experienced developer.
Running Your Script
To run your script:
- Open PyCharm and create a new Python file (e.g.,
selenium_test.py). - Copy and paste the above script into your new file.
- Save the file.
- Run the script by right-clicking in the editor and selecting Run
selenium_test.
You should see a Chrome window open, navigate to example.com, and then close. In your console within PyCharm, you’ll see the extracted text and the result of the comparison.
Congratulations. You deserve a pat!
You’ve just written and run your first Selenium WebDriver script in Python. This simple example demonstrates some fundamental Selenium concepts:
- Initializing a WebDriver
- Navigating to a webpage
- Finding elements on a page
- Extracting text from elements
- Comparing extracted text with expected values
From here, you can expand your scripts to interact with more complex websites, fill out forms, click buttons, and much more. Selenium is a powerful tool for web automation and testing, and this is just the beginning of what you can accomplish with it.
In our upcoming articles, we’ll dive deeper into more advanced Selenium concepts and techniques. Stay tuned!
