In the previous tutorial, we discussed the differences between WordPress.com and WordPress.org. We saw that the self hosted counterpart was far more powerful than the hosted CMS. Throughout this tutorial series our CMS of choice is going to be the self-hosted WordPress.org CMS. In this article we will explain how to install WordPress on your web host.
Prerequisites
Before you start installing WordPress there are the two things that you absolutely need in the first place.
- A web-hosting account: While there are several thousands web hosting providers with wide variety of offerings, we would suggest you to go with GrowBig Hosting Plan offered by SiteGround. Try to get a 3 years plan since they offer pretty heavy discount on the first invoice. While one can begin with the StartUp plan, GrowBig plan will ensure that you can host multiple sites and don’t worry about switching host/plans when you see an uptick in traffic.
- A domain name: Purchase from NameCheap. They are one of the no-nonsense domain name providers out there. Don’t forget to enable 2-factor authentication after your purchase.
Once both the steps are completed, point your domain name to your web hosting server. To do this please check this article – How to link a domain to a webhost? – , where we have explained using the step-by-step guide.
Install WordPress
There are several ways to install WordPress on a server. We will discuss the most popular two ways. The first way is by using one click installer already present in your web hosting control panel and the second one is manually using FTP client.
Install WordPress using One-Click-Installer
- Login in to your web hosting server cPanel. The login credentials of cPanel will be provided by your web hosting company during purchase of hosting package. Do check your email which you have received just after purchasing your web hosting plan.
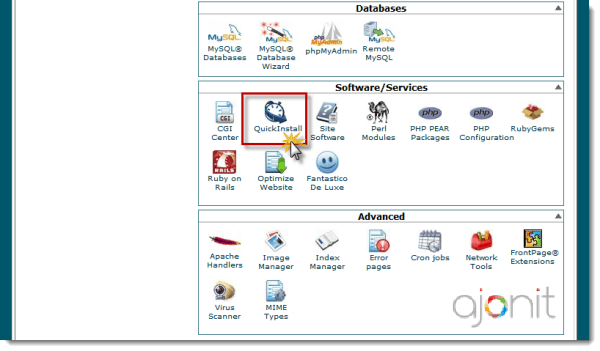
- Once logged-in to cPanel, look for the section Software/Services. This section may vary according to the cPanel version or customized cPanel interface. You should look for section something related to that. if you are unsure, check with your web host.
- Click QuickInstall. Again this may vary according to type of software your web hosting company is using. It can be QuickInstall, softaculous, installatron or Fantastico.
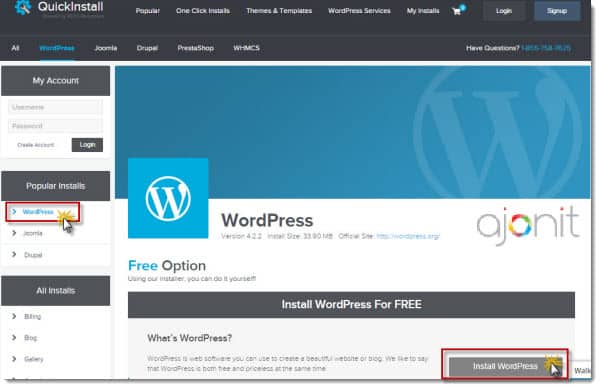
- You will redirected to another page where you need to choose which CMS or application you want to install. Choose WordPress from left sidebar under Popular Installs and click on Install WordPress button present under Install WordPress For Free section.
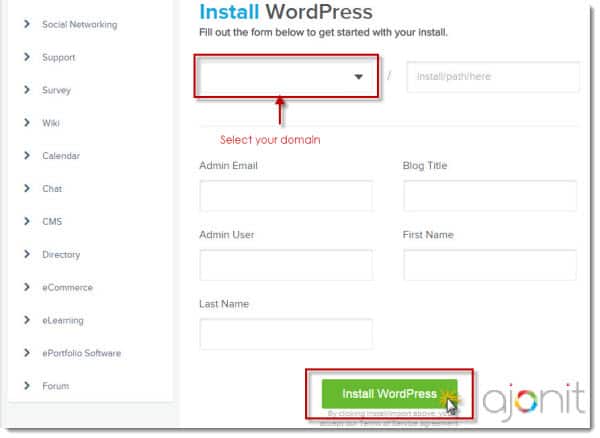
- You will get a form. Fill-in the required options including the email address that you want to use on the website and other details like name of the blog and your name. That’s it.
- Now you can login to WordPress CMS dashboard. Login URL and credentials will be automatically emailed to your email which you have filled in the form above.
- After login you will be able to access WordPress dashboard where you can start with some basic tasks like installing necessary plugins, your choice of theme and other trivial settings. These things will be detailed in future articles.
This is the typical fresh WordPress installed dashboard which you will get immediately after login.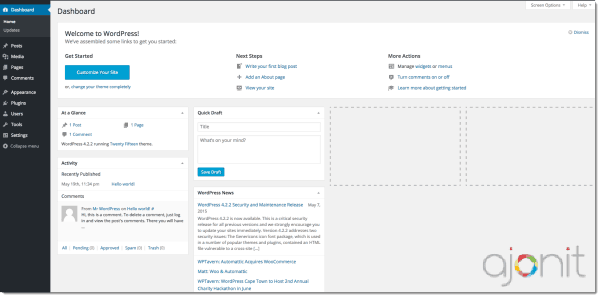
Install WordPress using FTP
In this case you need an FTP client. You can use the popular FileZilla open source FTP client or if you use Mozilla Firefox browser, you can install official FireFTP extension. (Here I’m going with FireFTP)
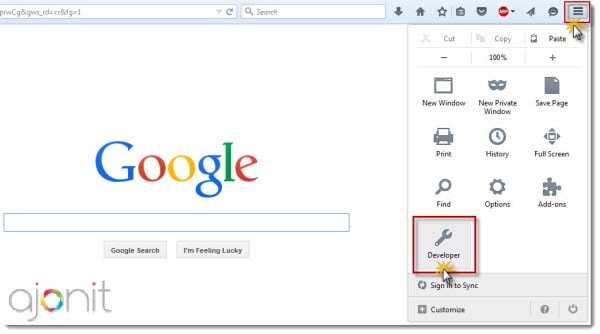
- First install FireFTP extension just like normal extension installation process in Firefox and restart the browser. After restarting click on top right side menu option. Under that click on Developer option and in the list choose FireFTP.
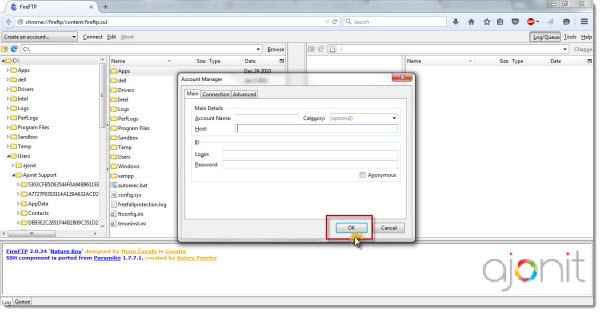
- You will get the typical FireFTP interface. At the left top side in dropdown select Create an Account. This will prompt an Account Manager. Fill-in the required information like ‘Account Name’, ‘Host’, ‘Login’ and ‘Password’. You can get these details from your cPanel and also probably your hosting company have sent these details in your account setup email. If they haven’t sent these details already, you can get these in cPanel under Files section and FTP Accounts option.
- Leave rest of the settings under Connections and Advanced tab and hit ‘OK’. After that hit Connect at the top left corner and if everything is OK, FireFTP will get connected to your hosting server. In case if there is any error in connection, do check your login credentials and/or site URL.
- Once you login, at right half section you will find some folder and files. Just navigate to public_html folder and double click on it. It will open in the second box at right side. In all probability it will be empty or contain a sample file.
- Go to WordPress.org and download WordPress zip package. Extract the zip file. Move to FireFTP , on left half side browse the WordPress folder which you have extracted. Right click and upload all files and folders under /public_html/.
- Once all files and folders are uploaded, open new tab and enter your domain name like yourdomainname.com. If you get something like seen in the screenshot below then everything is fine.
- Once you see the browser window like the above screenshot, go to your cPanel account. Under the section Databases, go to MySQL databases.
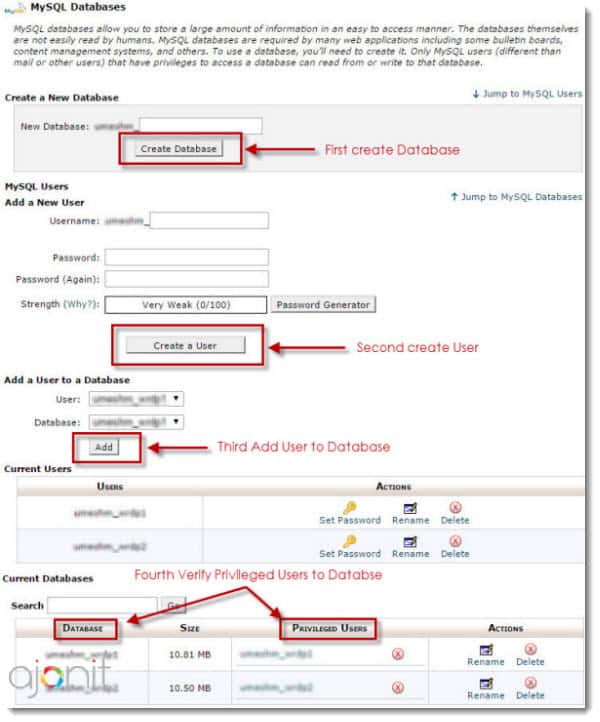
- Now you need to create a database and user manually. To do that, check the first option Create a New Database. Fill a combination of number and word and hit Create Database button. This will create a database, now go back and scroll down and find the option stating Add a New User under MySQL Users. Repeat the earlier process, put combination of number and word, fill the password which you want to use or use option ‘Password Generator’ and hit “Create a User” button. This will create a new user.
- Go back and find the option Add a User to a Database. Select the user and database in drop down and hit “Add” button. It will prompt you to choose privileges, select all and hit Make Changes button which gives you success message.
- To verify that everything went fine, just look at “Current Databases” section at top and check that “Database” and “Privileged Users” have same names that you just created.
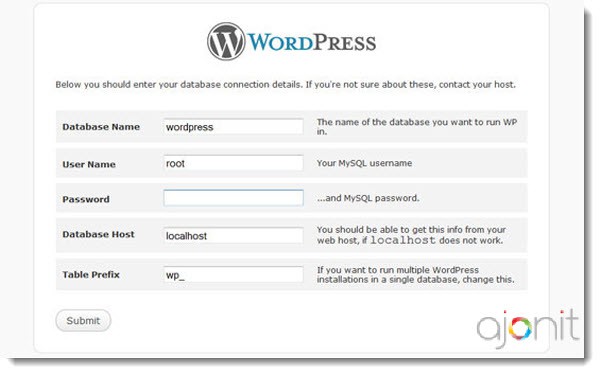
- Go back to your browser where you have typed your domain name and got the WordPress installation form [Step #6 above]. Fill in the form. Enter “Database Name” you created in previous step. After that in “User Name” fill the MySQL Username and in “Password” fill the password which you have created in previous step. Leave Database Host as ‘localhost’ by default and in “Table Prefix” replace the ‘wp_’ with your desired short word. Next hit submit and it will prompt you that everything is working fine.
- If everything went fine, you will be able to proceed to next step where you have to fill few more details like “Site Title”, “User Name”, “Password” and “Email”. Please note that this username and password should be different from the previous step and it is used to login to your WordPress admin dashboard. Once you fill-in the details, hit the Install WordPress button and it will install WordPress on your hosting server.
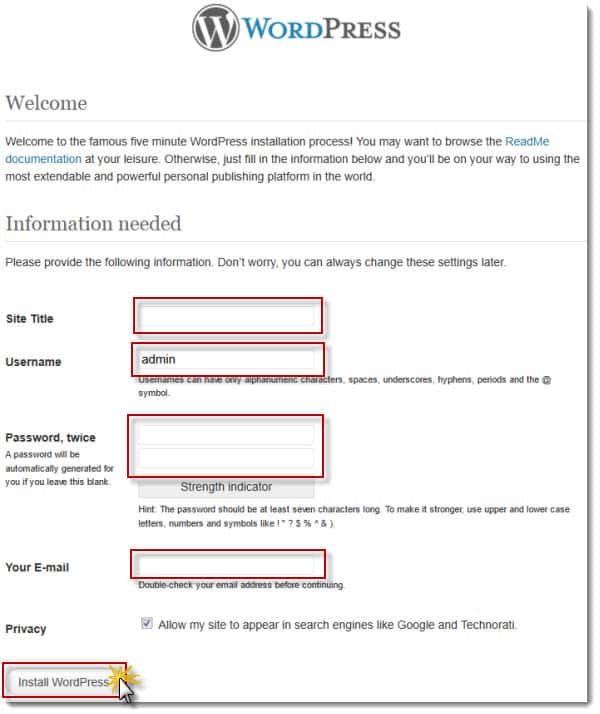
That’s it. Next check your email which you have entered in previous step where you will get an email with your WordPress login URL, User Name and Password. Visit the URL, enter the User Name and Password and you will be able to get inside your WordPress Dashboard.
